Lora Wargo Project 2: Laser Cutter
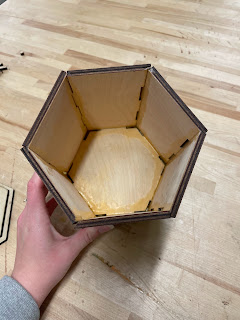
When beginning this project, I wanted to try something more challenging than just a box. I quickly found the hexagonal shape within Fusion 360 and decided that I wanted to make a hexagonal box.
After completing the pencil box tutorial, I started on my box with one of the sides, giving it all the cut-outs to fit together with another five sides which would be identical to the first. Then, I used the hexagonal shape and the cut feature to create the bottom of the box.
I faced my first problem when I attempted to duplicate my sketch of the side to create the other five sides. I wanted to use the Mirror feature to duplicate it around a center point, but the issue I was running into was how to set the pivot point. To solve this issue, I added a vertical line in the centerpoint of my base. I used that vertical line as my pivot point and duplicated the sketch to all sides.
Next, I wanted to create a lid for the box that would fit snugly using a smaller hexagon underneath the lid to keep it in place. On the top of the lid, I wanted to add the Air Force symbol. However, the issue was creating the lid in a manner so that, in the sketch, it would be atop the box. Because most sketches are directly on a plane, the sketch wanted to be directly on the base sketch. To resolve this, I added another plane, located directly on the rim of the box, and added my sketches to that plane.
To make the Air Force symbol, I could not use pre-made shapes, so I used the Line feature to draw one half of the symbol and mirror it to the other side. Using a reference image, I had to add, re-position, and parallel the many small pieces, which was quite time-consuming.
When I converted the sketch in order to place it in Adobe Illustrator, I found that I underestimated the size of the box I had created. My original design was going to take up six sheets of the plywood we were assigned, so I needed to scale it down. I scaled down the base and the sides first and printed them. They came out well, but then I ran into my next issue: the cut-outs would fit perfectly for a square shape, not a hexagonal shape.
I brought all the sides to the sander and sanded off the inside corner of the cut-outs in order to help it fit flat with the corresponding piece. On the first piece, I over-sanded it, which caused a hole in my piece. However, I figured out the dimensions for the other five parts. I taped all the pieces together and glued them into place with wood glue.
Next, I resized the top and the inside piece underneath the top to fit inside the box. I also decided to print another base in order to cover the other base and slightly elevate the box. On the new base, I engraved my last name, and I engraved the Air Force Mission into the inside of the lid. I lasercut the pieces and wood-glued everything together.
I still wanted the Air Force logo on the box, so I resized the logo within Fusion and laser cut it. I arranged them atop the lid, but when I went to glue them, I found that they were hard to pick up without disturbing all the other pieces. I used a needle nose set of pliers to pick up and glue the individual components onto the lid. One mistake I made, that I wish I could have gone back to fix, was that the symbol and logo are perpendicular to one another. In hindsight, I should have checked to see if they were aligned.
The final step was to sand the corners. I sanded down all the side joints in order to make the box more pleasant to the touch. After sanding it, I found that the sander revealed the layers of wood within the plywood, which I find visually appealing.
Overall, this project has been much more of a learning experience than the first one, but it has been a learning experience that I’ve enjoyed. I enjoy the laser cutter, and I find the sketch to be quite useful.


Comments
Post a Comment